Labels

General (3) Guidance (10) Pattern (10) Project (14) Tunisian (3)
Showing posts with label Pattern. Show all posts

Friday, August 26, 2016

Special Kembang Sepatu - 26 August 2016

Assalamu ‘alaikum wa rahmatullahi wa barakatuh :

السلام عليكم ورحمة الله وبركاته
(May the peace, mercy, and blessings of Allah be upon you)


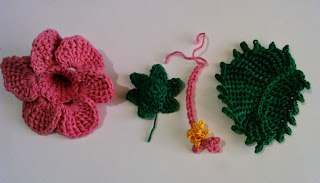
The Special Kembang Sepatu

Kembang Sepatu is the name we call in Indonesian language for Hibiscus.

Why I call this crocheted Hibiscus "The Special Kembang Sepatu"?

It is because:
1. Today's date is the date when I was born 54 years ago. It used to be very special date to me, if no one remembered it, I was kind of sad and up set. Nowadays, not so special any more, well it is still the date of my birth, no one can change that, however I wouldn't be up set or sad anymore if no one remember. It is because, actually in Islam we don't celebrate a birthday

2. This kind of flower was the first time came out of my mind when I wanted to design a Tunisian Crochet pattern. It is rarely someone to make this flower in crochet, so I could make sure that the pattern was originally my own design. The pattern can be found  in Ravelry: Kembang Sepatu in Tunisian Crochet

3. Today is the first time I can make a crocheted flower complete pattern in a day including crochet the flower itself. I can make the diagram pattern fast using the Crochet Charts Application.

I am happy to share the pattern here.


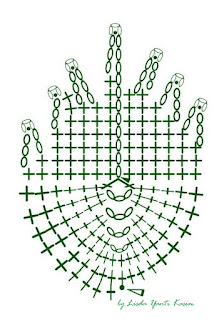
Hibiscus flower pattern

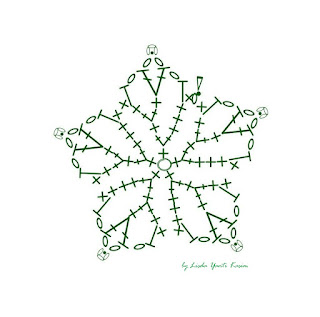
Calyx Pattern

Leaf pattern

Pistil Pattern

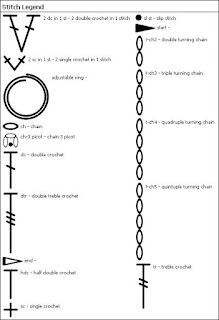
Stitches Library
Finish size:
Diameter approximately 8 cm

Material:
- Any kind  of crochet cotton thread or polyester

Hook: 2/0

Note: I worked in continuous rounds for the base of petal

Lets get started....

First we make the flower, well actually there isn't any fixed rules which one first,  follow the Hibiscus diagram pattern above.

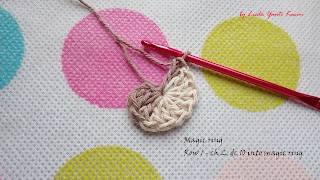
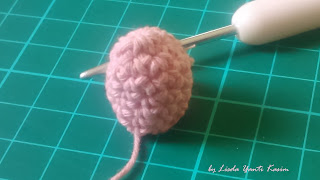
When you complete up to row 7, will be look like below image


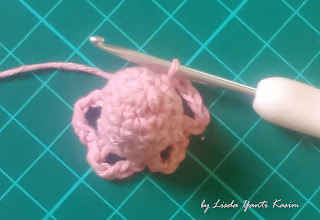
This is when you finish row 8


After you complete row 9, the whole petals, 80% the flower complete


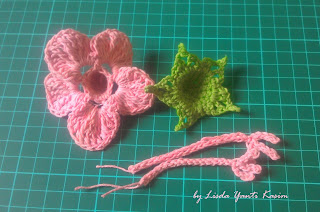
Next you can make the calyx, pistil and leaf

In below image, shows there are 2 pistils I made in 2 different way; 1 is as per diagram above and the other one I tried the technique to make robe that was shared by my friend, Iin Wibisono. She made the video how to make the crocheted robe. (sorry I don't have the link to her video to share)


After all part done, now can join all part.
You can use this Special Kembang Sepatu for anything, such as as brooch, or bad decoration, etc.
This time I made as it can be hanged anywhere.

First join the pistil inside the flower base, and then calyx at the bottom of flower, just on the center. And then make a simple robe, you can use the pistil pattern, which just make few amount of chains, in the middle part of robe make stalk (with the same technique) for the leaf, continue few chain and then  join at the bottom of calyx, last sl st all chains down to the 1st ch.


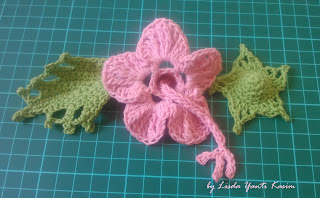
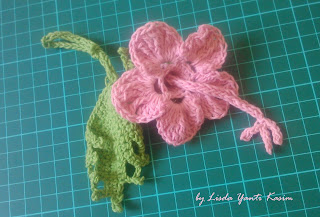
Here several images showing different angle:

Facing the flower


Showing from the bottom


The flower hanged


Isn't it beautiful????
#kembangsepatu ; #hibiscus ; #myowndesign ; #myownpattern ; #specialday ; #specialflower ; #august

Hope you like it .....
Happy crochet.....
Selamat Mencoba....
Let me know if you don't understand and please share if you succeed to make it.....
Wednesday, August 3, 2016

Peci Rumah Keong

Assalamu ‘alaikum wa rahmatullahi wa barakatuh :

السلام عليكم ورحمة الله وبركاته
(May the peace, mercy, and blessings of Allah be upon you)

Few months ago I found Beautiful Wonderful Spiral motif designed by Femininity (the signature stated on the picture). I am not sure the name of the designer because the blog is in Arabic.

I had tried to make the motif as follow: 


For step by step of making this Beautiful Wonderful Spiral motif please click the name.

I love this motif and it remind me the Snail's shell. It gave me an idea to make a hat (peci in Indonesian).

I designed the hat really look like a Snail's shell at the top of hat, so I modified little bit the pattern.

Materials:
- Cotton yarn any colour

Hook size : 2.5 mm

Pattern abbreviation used:
ch - chain
bpdc - back post double crochet
bphdc - back post half double crochet
bpsc - back post single crochet
sl st - slip stitch
lp - loop , sp - space

Note:
  • Adult size need 11 rows for the crown including the pointed shape.
  • The hat is divided into 3 parts of making process such as;

  1. Part 1 - making the top part
  2. Part 2 - making the down part (the side of the hat)
  3. Part 3 - ribbing


  • Please follow the instruction in each pictures below for step by step to make Part I

PART I - POINTED SHAPE IN THE MIDDLE TOP


Total 20 sts (count from the bpdc that has marker)


Total 30 sts


Total 40 sts

Total 50 sts

Total 60 sts

Total 70 sts

Total 80 sts


Complete Part I with 80 sts on the last row (row 11).


Note:
  • Make 8 squares of The Beautiful Wonderful Spiral - please refer to the link above for making the square
  • The square consist of 5 rows
  • Last row of the square consist of (11 sts, 2 ch sp) on each side
  • Divided the Part I last row into 8 divisions consist of 10 sts each.
  • Join each sts of the last row square; one side to Part I; two sides to each squares


How to join the sts: Please refer to Joining sts

Complete Part II and has been joined to Part I and each 2 side of Part II

PART III - Ribbing

Before making the ribbing, start from one st of below side square, and continue with the following row:

Row 1:  ch 2, bpdc 1 into next 10 sts, dc2tog (1 dc in 2 ch sp of the same square and 1 dc in 2 ch sp of next square), [ bpdc 1 into next 11 sts, dc2tog (1 dc in 2 ch sp of the same square and 1 dc in 2 ch sp of next square)] 7 times, sl st in 2nd ch of ch 2.

Row 2 & 3: ch 2, bpdc 1 into each sts all the way around to the last st, sl st in 2nd ch of ch 2.

Start the ribbing:

Row 4 - 6: ch 2, (bpdc 1 in next st, fpdc 1 in next st), repeat () all the way around to the last st, sl st in 2n of ch 2

Complete the hat, fasten off.


Peci  Rumah Keong

For the flat top hat, omit row 3 & 5 of Part I, Part II & III remain the same.


 PART I OF THE FLAT TOP HAT


9 rows with total 80 sts of the last row


Selamat mencoba...
Happy crochet......

#hat , #peci , #rumahkeong , #snails , #crochet , #myowndesign , #beautifulwonderfulspiral , 

Thursday, February 11, 2016

Peci Haji (White Hat)


Assalamu ‘alaikum wa rahmatullahi wa barakatuh :

السلام عليكم ورحمة الله وبركاته
(May the peace, mercy, and blessings of Allah be upon you)


In Indonesia we name this type of white hat as "Peci Haji" because usually it is worn by male who had already performed hajj pilgrim in Mekkah. Please ignore the female mannequin I used in the picture.

I designed this particular Peci Haji because a friend of mine asked me to make one for him.

Usually, the hat is just in simple sts, but this time I put some motives  on the hat but still look masculine.

The pattern is as follow:

Material: White Rayon thread
Hook size: 1.50 mm

Estimate measurement:
Diameter 31 cm

Diameter of the crown – 11.5 cm 
Height of the hat: 9.5 cm

Stitches are used in the pattern:
Ch - chain
Dc - double crochet
FPDC - Front Post Double Crochet
BPDC - Back Post Double Crochet
FPTR - Front Post Treble 
BPTR - Back Post Treble
Sl st - slip stitch

Special Note:
  •  The 2 ch at the beginning of each round do not count as 1st dc/sts
  •  Sl st always at the 1st sts
  •  Round 1 to 11 - to form the crown of the hat. In this part there is increase sts in each round. Increase or decrease the amount of round in this part to adjust the size of the hat.
  • - Round 12 to 26 - to form the height of the hat. No more increase sts in each round.


Ch 6 – sl st to form ring

Round 1 – ch 2, dc 12, sl st

Round 2 – ch 2, 2 FPDC into 1st st, (2 FPDC into next st) 11 times, sl st

Round 3 – ch 2, 1 BPDC into 1st st, (2 FPDC into next st, 1 BPDC into next st) 11 times, 2 FPDC into last st, sl st

Round 4 – ch 2, 1 BPDC into 1st 2 sts (2 FPDC into next st, 1 BPDC into next 2 sts) 11 times, 2 FPDC into last st, sl st

Round 5 – ch 2, 1 BPDC into 1st 3 sts (2 FPDC into next st, 1 BPDC into next 3 sts) 11 times, 2 FPDC into last st, sl st

Round 6 – ch 2, 1 BPDC into 1st 4 sts (2 FPDC into next st, 1 BPDC into next 4 sts) 11 times, 2 FPDC into last st, sl st

Round 7 – ch 2, 1 BPDC into 1st 5 sts (2 FPDC into next st, 1 BPDC into next 5 sts) 11 times, 2 FPDC into last st, sl st

Round 8 – ch 2, 1 BPDC into 1st 6 sts (2 FPDC into next st, 1 BPDC into next 6 sts) 11 times, 2 FPDC into last st, sl st

Round 9 – ch 2, 1 BPDC into 1st 7 sts (2 FPDC into next st, 1 BPDC into next 7 sts) 11 times, 2 FPDC into last st, sl st

Round 10 – ch 2, 1 BPDC into 1st 8 sts (2 FPDC into next st, 1 BPDC into next 8 sts) 11 times, 2 FPDC into last st, sl st

Round 11 – ch 2, 1 BPDC into 1st 9 sts (2 FPDC into next st, 1 BPDC into next 9 sts) 11 times, 2 FPDC into last st, sl st

Round 12 – ch 2, 1 DC into 1st 10 sts (1 FPTR into next st, 1 DC into next 10 sts) 11 times, 1 FPTR into last st, sl st – next start to make belah ketupat

Round 13 & 23 – ch 2, 1 BPTR into 1st st, 1 dc into next 8 sts, 1 BPTR into next st, (1 FPTR into next st, 1 BPTR into next st, 1 dc into next 8 sts, 1 BPTR into next st) 11 times, 1 FPTR into last st, sl st

Round 14 & 22  – ch 2, 1 FPTR into 1st st, 1 BPTR into next st, 1 dc into next 6 sts, 1 BPTR into next st, (1 FPTR into next 3 sts, 1 BPTR into next st, 1 dc into next 6 sts, 1 BPTR into next st) 11 times, 1 FPTR into last 2 sts, sl st

Round 15 & 21 – ch 2, 1 FPTR into 1st  2 sts, 1 BPTR into next st, 1 dc into next 4 sts, 1 BPTR into next st, (1 FPTR into next 5 sts, 1 BPTR into next st, 1 dc into next 4 sts, 1 BPTR into next st) 11 times, 1 FPTR into last 3 sts, sl st

Round 16 & 20 – ch 2, 1 FPTR into 1st  4 sts, 1 BPTR into next st, 1 dc into next 2 sts, 1 BPTR into next st, (1 FPTR into next 7 sts, 1 BPTR into next st, 1 dc into next 2 sts, 1 BPTR into next st) 11 times, 1 FPTR into last 3 sts, sl st

Round 17 & 19  – ch 2, 1 FPTR into 1st 5 sts, 1 BPTR into next 2 sts, (1 FPTR into next 9 sts, 1 BPTR into next 2 sts) 11 times, 1 FPTR into last 4 sts, sl st

Round 18  – ch 2, 1 FPTR into each sts from the 1st st to the last sts, sl st

Round 24 – ch 1, *1 sc into each sts from the 1st st to the last sts, sl st, ch 1 and turn

Round 25 – 26 – repeat round 24 from *


#hat, #crochet, #pecihaji

Wednesday, September 30, 2015

Pucuk Rebung Shawl - in Knitting Lace


2nd Pucuk Rebung Shawl in Knitting Lace

Assalamu ‘alaikum wa rahmatullahi wa barakatuh :

السلام عليكم ورحمة الله وبركاته
(May the peace, mercy, and blessings of Allah be upon you)

First of all, I would like to thank Allah that has bless me with so much knowledge and talent I have. Without His permission and blessing of all this would not have happened.

About  3 weeks ago I just joint a knitting group in a social media website. That group is for people who have the same hobby which is knitting, can communicate each other and share information, knowledge and work relate to knitting.

Actually I wasn't so confident to join that group because I am not a knitter. I don't know much of knitting, however, I learned it long time ago only from 2 books I had. The reason I wanted to learn how to knit because:

  • I just love all of needle crafts
  • I am kind of person who like to learn new technique
  • I am kind of person who always curious on something different, something unique, something unusual and something that I haven't known before.
  • I am kind of person who don't just satisfy on something that already familiar with me.
  • I am kind of person who don't easy to give up on something that I don't know or something that I haven't know how to do it.
  • I believe any knowledge/technique can be learned if there is will.
  • I wanted to make beautiful Aran sweater for my kids. This is the main reason I wanted to learn how to knit at the beginning.

After I know how to knit little bit, I made some projects to practice several knitting techniques.

Recently, I had idea to explore something new and different. I was thinking to use Indonesian traditional motifs in crochet or knitting. 

  • I beleive that will make so unique and exclusive motif that never been applied before. 
  • I believe if we can apply Indonesian traditional motif in crochet or knitting, we will have our own motif which has its own characteristics
  • We can introduce Indonesia to the world in different way
  • we will not run out of ideas because Indonesia is very rich in a variety of traditional motives from each province.
The 1st motif I would like to apply in crochet or knitting is 'Pucuk Rebung'. 

In Indonesia we have traditional hand woven sarong called Songket. There are many type of songket in Indonesia, one of them from Riau (a province in Sumatra Island). Some provinces have their own type of motif used in the songket. One of Riau's songket motif called Pucuk Rebung. There are several type of Pucuk Rebung motives.

Philosophy behind Pucuk Rebung Motif:
The meaning of Bamboo shoots Motif is a symbol of hope because bamboo is a tree that does not easily fall by the wind blowing. By using bamboo-shoots motif on Songket meant; who ever wear it hopefully would has good luck and hope in every step of life.


The reason I choose the motif from Riau Songket because:
  •   I come from that province, I love my province and that motif.
  • As far as I know, no one have ever use this motif in needle craft such as knitting or crochet. 
  • I would like other people more familiar with this beautiful traditional motif in different style and appearance.
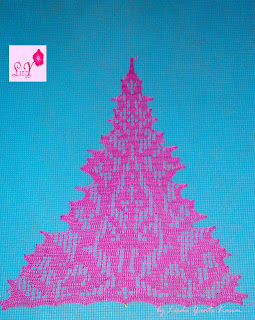
I tried to make a simple diagram of Pucuk Rebung motif from the existing motif in Songket, so I can apply to needle craft.

First tried to make it in fillet crochet, it turned out so beautiful although I haven't make it in complete product.


Pucuk Rebung in Fillet Crochet

Next I tried to make in Tapestry Crochet. In this project, I used 5 different colors. Finally I can create small bag with this motif.


Pucuk Rebung in Tapestry Crochet

Another project I made using this motif was a shawl for my friend's mom. The reason I choose this motif in the shawl to make it so unique, exclusive and definitely I made it with my own design.

The 1st Pucuk Rebung in Knitting Lace

When that shawl finished, I was so satisfy with the result. I was so amazed to the talent I have been given by Allah because I realize that I still can knit and can design a beautiful shawl with beautiful Indonesian traditional motif.

After I sent the shawl to my friend, I started to miss my Pucuk Rebung Shawl. I decided to make another one. When I share this work to the group, so many nice and sweet ladies gave their appreciation, sweet compliments, suggested and encouraged me to write complete pattern of the shawl. They gave me confidence and courage to start to write the pattern. Took me more than a week to write it and Alhamdulillah it has completed by today and uploaded in Ravelry.


#PucukRebungShawl ; #PucukRebung ; #Knitting ; #FilletCrochet ; #TapestryCrochet ; #IndonesiaTraditionalMotif ; #Crochet ; #Shawl


Friday, May 8, 2015

Kembang Sepatu in Tunisian Crochet

Assalamu ‘alaikum wa rahmatullahi wa barakatuh :

السلام عليكم ورحمة الله وبركاته
(May the peace, mercy, and blessings of Allah be upon you)


Kembang Sepatu
(Hibiscus) in Tunisian Crochet


In August 18 2014, was the first time I made a flower in Tunisian Crochet. The inspiration I got from a friend who shared how to crochet a flower using Tunisian crochet technique, I didn't know the name of the flower.

Base on that sample, I wanted to crochet a flower in Tunisian crochet too but I did not want to make the same flower. so I search what kind flower I would like to make. I wanted a simple but unique. First name came in my mind was Kembang Sepatu flower (Hibiscus); it is fit to my criteria. It is simple because it is only has 5 petals and the unique about this flower because it has long pistil (style).


The first time I made, I did not realize I made mistake. I made 6 petals instead of 5, however I did not frog it. I kept it as my own remembrance. I found out when I looked at this picture.

My 1st Kembang Sepatu in Tunisian Crochet


I was very satisfy with my own design of this Kembang Sepatu brooch. It gave me idea to make the pattern. Took me few days to make the complete pattern because the pattern is consist of written, diagram and several pictures of step by step process to make one petal. In the pattern, it is not just how to make the flower but also consist of how to make the leaf, pistil and stigma. Don't worry in this pattern I designed for 5 petals flower.


Anyone wish to make this Kembang Sepatu Brooch you can find the complete pattern just by click this name: Kenbang Sepatu

This morning, 27 August 2016, finally I found the real name of the stitch I used in the pattern, called "Tunisian Top Stitch" or "Tunisian Bump Stitch"