Assalamu ‘alaikum wa rahmatullahi wa barakatuh
(May the peace, mercy, and blessings of Allah be upon you)
 |
| Image 1 |
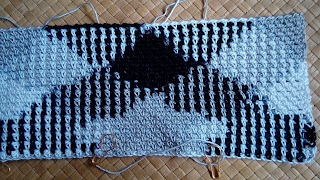
Planned Pooling (PP) is a unique and interesting way to create design in crochet or knitting from a variegated yarn (a yarn that's dyed using more than one color). Many variegated yarns have a repeating sequence of colors; can be 2 or more colors, and the length of each colors are varieties.
There are many kind of motifs can be created in PP technique.
Since the yarn PP trend hit between some of my friends a few weeks ago, there have been several tutorials posted in the group on how to achieve yarn pooling by my friends, however I experienced some difficulty in understanding how it worked.
Alhamdulillah, I have a friend who is very patient to help me to do the PP in crochet. She guided me through messenger, long distance guidance because she lives in Malaysia. She helped me step by step, and she also gave me the link of PP tutorial by Marly Bird . Although, I had understood the theory of the PP after watched the video, but I just didn't understand why it never worked when I tried using the variegated yarn I have.
First I tried to make the graph using the Planned Pooling website:
 |
| Image 2 |
Next I follow the technique from video tutorial by Marly Bird.
Here were several results of trial and error I had ever made:
 |
| Image 3 |
 |
| Image 4 |
Looked horrible. I almost given up to make PP, I believed this PP was just not for me.
At my last trial, I finally found the basic logic of the PP, I could see how it work when I remembered Marly mentioned about the tension and also I found out that the yarn I used, have different lengths of colorways in some sequences, Therefore, the chain/sts counts cannot be consistent.
Due to the lengths of variegated colors in different colorways can be and are different, So the colorway should be treated uniquely and not the same as each other. The chain count may not make sense for the yarn I am using.
So I tried to look in different way to form the PP design by again using a little trial and error to get the design to work with my variegated yarn.
Finally, I am happy that I still can do the PP although I don't count the sts anymore after row 2. The key word is "tension"
I noticed I had to be very precise when it came to my tension. It was interesting because as I mentioned above that some of colorways had different length . So I have to make sure I tighten or loosen my tension slightly for the PP pattern continued to work. Other than that,I had to keep a very even tension throughout.
I am going to show you how I did it with this specific yarn. Like other PP, I also use Moss sts.
Moss Stitch: The Moss stitch (also called the Granite stitch); sc 1, ch 1, skip 1 st, sc1, ch 1 in next - For more details you can see tutorial by Moogly
Here is my version, step by step to make PP
First make ch for the length of project you would like to make plus about 10 cm for the base (This prevents you from having to constantly restart your chain if you still have not reach the desire length of work, and will get you on your way faster)
Chain until the complete color sequence is done (at least 1 set of color sequence). i.e. If there are 3 different colors (black, grey, white), these considered as 1 set.
This means you will stop once the color sequence begins to repeat. It doesn’t matter which color you start with. Stop on the color before the next color (which is repeating) begins. Much better stop in very contrast color sequence, i.e between black and white or between black and grey.
You might not use the entire chain, do not worry about that. You will stop when the color sequence is completed. This will leave unused chains that you will undo later.
In this sample I made PP only 1 color set - the last ch at White colorway sequence, and then start the Moss sts.
 |
| Image 5 |
After Row 1 completed, count the sts of each colorway sequence. The colorway sequence starts from Black and end in White.
Black - 10 sts
Grey - 12 sts
White - 12 sts
Before start row 2, omit last sts of White colorway, remain 11 sts.
Row 2: (start with White) - *ch 3, sc 1 into the 1st ch 1 sp, (ch 1, skip 1 st, sc 1 in next st), repeat () to the last ch 1 sp remain, sc 1 into the last ch 1 sp*
In this row 2 consist of: 1st Moss st in White, 10 Moss sts in black, 12 Moss sts in Grey, and 11 Moss sts in White - Match with Row 1
These 1st two rows are the base of the PP design. From now on, do not really necessary to count of each sts. Just follow colorway sequence position of these 2 rows.
 |
| Image 6 |
Row 3 - to next rows - repeat ** of row 2
 |
| Image 7 |
Important Note:
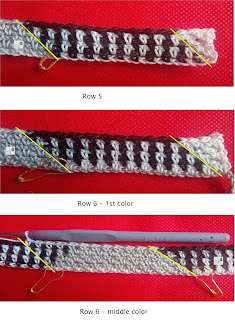
- Always pay attention to last st of each colorway in running row and the last sts of each color of 2nd row below from running row . The position of last st should move forward one Moss sts, as shown on image 7.
- Continue work the next rows with the same step as the row 3
- After few rows, will start to form the PP design . It is getting easier, just follow the line formed (that lean on to the left side) at lower rows. Refer to yellow line on image 9.
 |
| Image 8 |
 |
| Image 9 |
Few tips:
 |
| Image 10 |
Image 10 - green v shape represent is 1st Moss sts of new colorway sequence (Black); the position should always be on the above of 2nd sts of 2nd row below from running row, which is the same colorway.
 |
| Image 11 |
Image 11 - Similar to image 10 but in middle colorway sequence.
It shows where to place the last st of a colorway sequence - the light green v shape is the last st of Black, and at the same time where to place the 1st of next colorway sequence - orange circle shape is the 1st Grey.
Next tips are; when you facing the colorway is shorter or longer than the previous one:
 |
| Image 12 |
Image 12 - shows the last colorway is little bit too long. Look at the ch 1 sp in triangle shape on the picture 1, supposedly in that ch 1 is the new colorway sequence which is Black. It's mean there are 2 extra sts of White. To solve this problem is by loosen the tension of few previous sts in White colorway. Frog 4 to 5 sts, and then redo each sts in little bit more loose tension then the regular one until you reach the new colorway sequence on hook before making 1st st of new colorway in the correct position.
 |
| Image 13 |
Image 13 - shows the last colorway is little bit too short. Look at the circle position on the picture 1, supposedly in that ch 1 sp should be still in same colorway which is White, however, the colorway on hook already reach new colorway (Black). It's mean there is 1 short of st in White. To solve this problem is by tighted the tension of few previous sts in White colorway. Frogging 4 to 5 sts, and then redo each sts in little bit more tight tension then the regular one until you reach the new colorway sequence on hook before making 1st st of new colorway in the correct position.
 |
| Image 14 |
Image 14 - similar case to image 13 but in middle colorway sequence - do the similar way.
Hope this my version guidance in making PP help you little bit or even more...
Happy crochet......
Selamat mencoba.....
No comments:
Post a Comment