السلام عليكم ورحمة الله وبركاته
(May the peace, mercy, and blessings of Allah be upon you)
Few months ago I found Beautiful Wonderful Spiral motif designed by Femininity (the signature stated on the picture). I am not sure the name of the designer because the blog is in Arabic.
I had tried to make the motif as follow:

For step by step of making this Beautiful Wonderful Spiral motif please click the name.
I love this motif and it remind me the Snail's shell. It gave me an idea to make a hat (peci in Indonesian).
I designed the hat really look like a Snail's shell at the top of hat, so I modified little bit the pattern.
Materials:
- Cotton yarn any colour
Hook size : 2.5 mm
Pattern abbreviation used:
ch - chain
bpdc - back post double crochet
bphdc - back post half double crochet
bpsc - back post single crochet
sl st - slip stitch
lp - loop , sp - space
Note:
- Adult size need 11 rows for the crown including the pointed shape.
- The hat is divided into 3 parts of making process such as;
- Part 1 - making the top part
- Part 2 - making the down part (the side of the hat)
- Part 3 - ribbing
- Please follow the instruction in each pictures below for step by step to make Part I
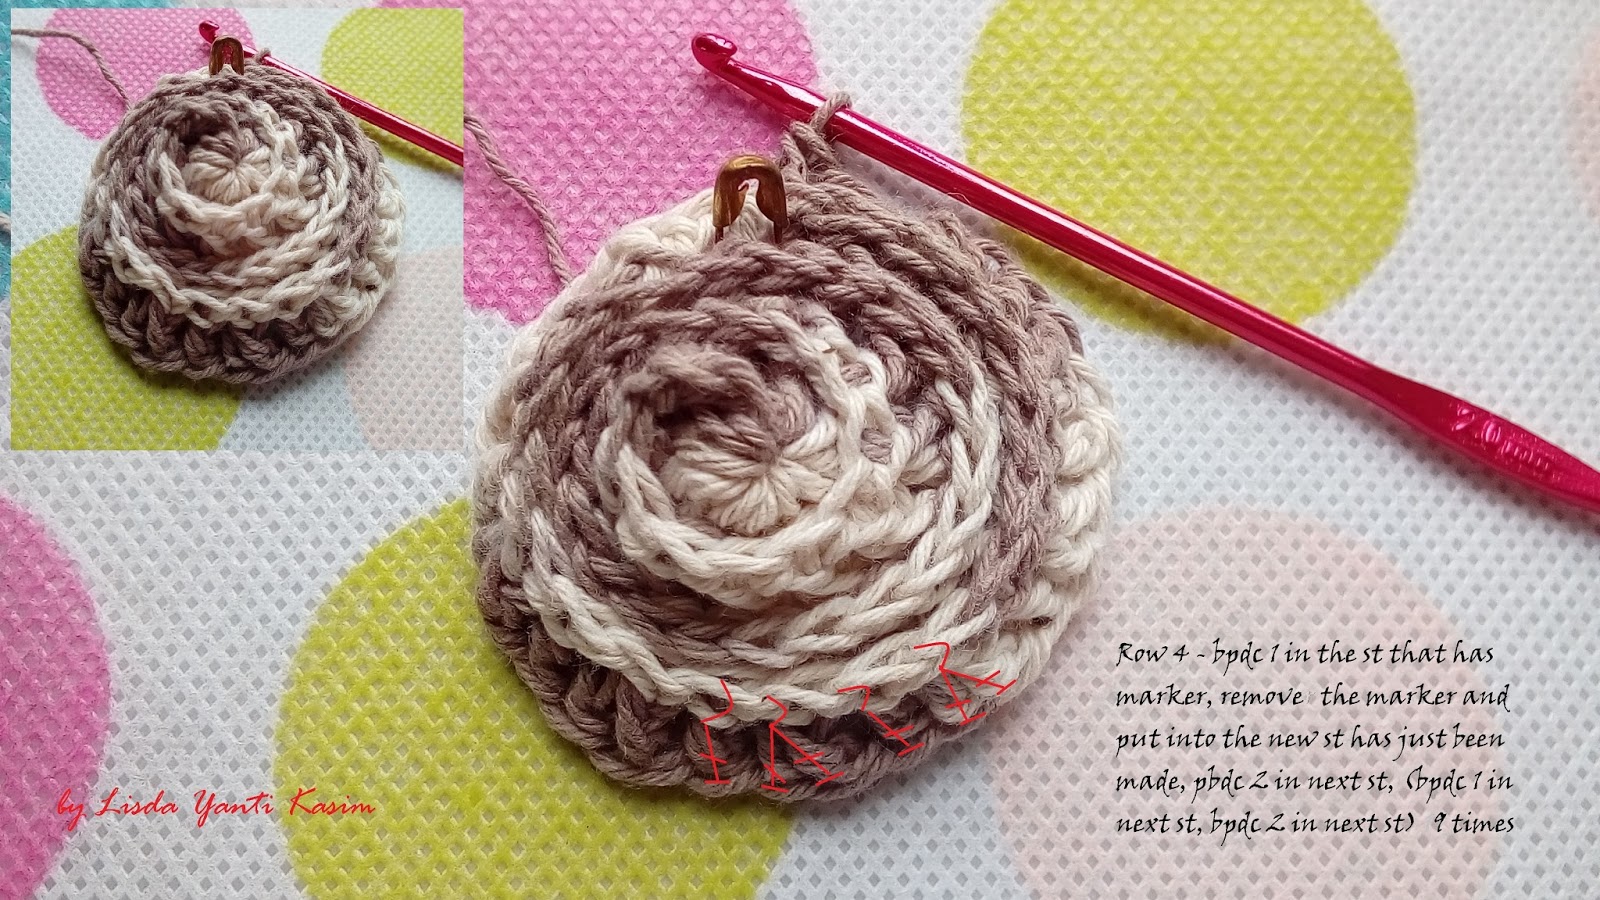
PART I - POINTED SHAPE IN THE MIDDLE TOP


Total 20 sts (count from the bpdc that has marker)

Total 30 sts


Total 40 sts

Total 50 sts

Total 60 sts

Total 70 sts

Total 80 sts

Complete Part I with 80 sts on the last row (row 11).
PART II - The Beautiful Wonderful Spiral Square
Note:
- Make 8 squares of The Beautiful Wonderful Spiral - please refer to the link above for making the square
- The square consist of 5 rows
- Last row of the square consist of (11 sts, 2 ch sp) on each side
- Divided the Part I last row into 8 divisions consist of 10 sts each.
- Join each sts of the last row square; one side to Part I; two sides to each squares

How to join the sts: Please refer to Joining sts
Complete Part II and has been joined to Part I and each 2 side of Part II
PART III - Ribbing
Before making the ribbing, start from one st of below side square, and continue with the following row:
Row 1: ch 2, bpdc 1 into next 10 sts, dc2tog (1 dc in 2 ch sp of the same square and 1 dc in 2 ch sp of next square), [ bpdc 1 into next 11 sts, dc2tog (1 dc in 2 ch sp of the same square and 1 dc in 2 ch sp of next square)] 7 times, sl st in 2nd ch of ch 2.
Row 2 & 3: ch 2, bpdc 1 into each sts all the way around to the last st, sl st in 2nd ch of ch 2.
Start the ribbing:
Row 4 - 6: ch 2, (bpdc 1 in next st, fpdc 1 in next st), repeat () all the way around to the last st, sl st in 2n of ch 2
Complete the hat, fasten off.


 |
| Peci Rumah Keong |
For the flat top hat, omit row 3 & 5 of Part I, Part II & III remain the same.

 |
| 9 rows with total 80 sts of the last row |


Selamat mencoba...
Happy crochet......
#hat , #peci , #rumahkeong , #snails , #crochet , #myowndesign , #beautifulwonderfulspiral ,
No comments:
Post a Comment