One day I
found a picture of a scarf which I think is very unique and interesting. The
style is consist of small spirals.
Before I saw that scarf, I've ever thought of making a scarf that consist of small spirals but still couldn’t imagine how it would look like. After I saw that picture, immediately I remember my idea and it was similar to what I wanted to make. By improvised materials i.e. using local cotton thread and colors available at home plus without any pattern, instantaneously I imitated and made the scarf.
The first one I made was using the dominant color of dark green. I used trial and error method to decide length and width of the scarf. When it finished, I put it on mannequin to have a look, I feel satisfied because the result was similar to my original idea. After that arose another idea to wear it in several different ways, but I need a brooch as fastener at two ends of scarf. I make a rose brooch in matching color to scarf. Here are pictures of the scarf in several different style on neck, and even well worn on waist or hips.


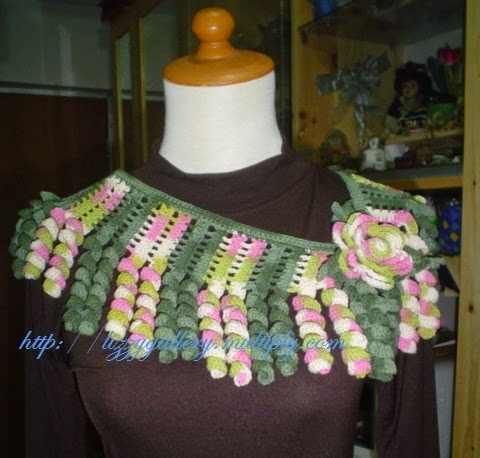gj.jpg)

.JPG)
Around March 2011, in some regions ( in Indonesia) were infected with caterpillar outbreaks in very large numbers. Citizens overwhelmed by their fruit trees, especially mango trees, all leaves are devoured by caterpillars. Their houses were also entered by caterpillars. The government also overwhelmed to eradicate this epidemic, but some kids were enjoying this epidemic and playing with caterpillars without fear of irritation.
When I heard the caterpillar outbreaks news and saw the scarf, focus at the spiral part, I suddenly imagined it as caterpillars were hanging around. So I named the scarf: Hanging caterpillars Scarf.
On May 27-29- 2011, I was invited by a friend to join an exhibition, with knitting as the theme. On the first day, one visitor, interested in my Hanging caterpillars scarf, she interested in buying it but still did not agree with the price. The lady bargained for half price, but I stick to the price I specified because I thought it is not too expensive (it is appropriate enough with the materials and efforts of making it). She went away. But when I was about to go home, all of the sudden she came back, and still bargained the price but she rose up slightly from the original bid. After negotiated with my friend, we agreed to sell it to her, because I was glad there were someone who has the same taste and appreciate my work. I was so proud, finally the lady bought my scarf. The lady said that she loved all crochet works.. Unfortunately I could not remember the lady’s name. This is my bad habit, easy to forget someone's name. The good thing, before she went away, we requested her willingly to take picture wearing the scarf as memorable and gratitude. Alhamdulillah at least, I could remember the lady’s face.
After the exhibition, I really missed my first Hanging caterpillars scarf. To cure my longing for it, I made the second one, still using the materials and colors available, but this time I used maroon as the dominant color, just to make a different. It was completed in 3 days.

This is the short story behind the making and naming processes of this Hanging caterpillars scarf.
PATTERN:
Abbreviation:
Ch - Chain
Sc - Single Crochet
Hdc - Half Double Crochet
Dc - Double Crochet,
St (sts) - Stitch (Stitches)
Sp - Space
Dc2tog - make 2 double crochet at the same times at the sts stated.
Row 1: ch 7 (for a flat base - could be more or less depending on the desired width of the base) plus ch 35 for the spiral (you could add/reduce number of ch - depend on desired length of spiral), ch 1, sc into 2nd ch from the hook, 2 hdc into next ch, 3 dc in next ch, (1 dc into next 2 ch, 4 dc into next ch) repeat 32 times, 1 dc into last 7 ch.
Row 2: ch 5, skip 2 st, 1 dc into next st, ch 2, 1 dc into last st, ch 35, turn
Row 3: ch 1, 1 sc into 2nd ch from hook, 2 hdc into next ch, 3 dc into next ch, (1 dc into next 2 ch, 4 dc into next ch) repeat 32 times, 1 dc into next st, * 2 dc into next 2 ch sp, 1 dc into next st *, repeat **, 1 dc to the last st.
If you wish to have fixed width for the flat base:
Next rows : repeat row 2-3 until the desired length of scarf complete.
If you wish to have flat base ; narrow at both end and wider in the middle (i.e. start from about 2 cm wide on the first end, about 6 cm in the middle, and then narrowed again at the other end same as the previous end (2 cm), follow the next step:
Row 4: ch 5, skip 2 st, 1 dc into next st, 2 ch, (1 dc into next st, 2 ch, 1 dc into same st), ch 35, turn,
Row 5 and every odd row: repeat row 3
Row 6: ch 5, skip 2 dc, 1 dc into next st, * 2 ch, 1 dc into next st* repeat **, ch 35, turn
Row 8: repeat row 4
Row 10: repeat row 6
Row 12: repeat row 4
If the width of the flat want to be more wide, repeat row 8-12 one or more times to the desired width.
Row 14 and the next even row: repeat Row 6 - If you still want more length can be added. (in this scarf made up to row 94)
Now the width of the flat began to be reduced
Row 96: 5 ch, *skip 2 sts, 1 dc in the next st, 2 ch* repeat from ** until remain the last 6 sts, skip 2 sts, dc2tog in the last 3rd and 6th sts, ch 3, turn
Row 98: repeat row 6
Row 100: Repeat row 96
Row 102: Repeat row 6 - for the width that is added; the decrease rows (rows 98-102) must be repeated same as rows are increased.
Row 104: 5 ch, skip 2 sts, 1 dc into next st, 2 ch, skip 2 sts, dc2tog in the last 3rd and 6th sts, ch 35, turn
Row 106: Repeat row 2
Row 107 (the latest row): repeat row 3
Edging: 1 sc along edge of the flat part. Can be used one dominant color yarn or each row using each color of yarn used. The width of the edge is free.
Note: the number of increased row should be the same with the decrease one.
I apologise if there is some missing in this pattern and please correct me.
No comments:
Post a Comment